[Being a study on the methods and culture of the young Tau race]

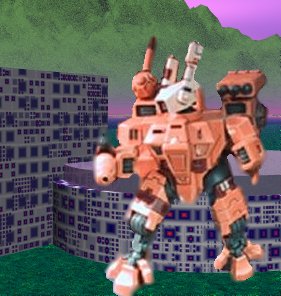
The Tau are the latest army to appear in the Warhammer 40,000 universe. Appearing in the Eastern Fringe, they have some of the highest technology of any alien race in the galaxy. The Tau have made a deal with the Kroot for their services, and use them for protection in times of war.
In the same manner as any other army, the Tau army needs to strike a balance between its units. The Tau and Kroot are two very different extremes. Where the Tau are physically weak and excellent at laying down vast amounts of firepower, the Kroot are awesome close combat fighters with the ability to put out a decent (but hardly crippling) amount of firepower. Taken separately, the two forces have awesome strengths, yet crippling weaknesses. Together, their abilities complement each other and they form an awesome force.
It is the purpose of this tactica to show you what the strengths, weaknesses, and uses of the different parts of a Tau army are, and how to combine these units and use them on the battlefield for maximum effect. To that end, I will first give a run down of the different units and then explain the tactics available to the Tau army.
THE TAU
The Tau forces should form the main portion of your army. They will provide almost all of your firepower, but don't expect to win battles with just the Tau. While you can put out firepower that would make an Imperial Guard commander envious, you will lose the battle as soon as you're engaged in hand to hand combat. You should also watch out for units that present a danger to your Kroots. Without them, your Tau will soon be in cover. The Kroots protect the Tau, and in the same manner you should use the Tau to protect the Kroots.
The leader of your army will be a Commander. Don't worry too much about giving him the biggest and baddest weapons, because even a plasma rifle will be enough for him. Your Commander is there to lead your troops. Don't make the mistake of giving him too much firepower and investing a lot of points into one very tempting target. Buy some shield drones to protect him, as well as a shield generator. You'll need them! You can protect your commander with a bodyguard of Shas'rye. They'll be able to protect him from most firing and any assaults. The Commander can be used for fighting, but don't take him against something you can't handle. And remember, just because the Shas'el Commander has lower stats than the Shas'o, this makes him no less of a leader, and in a small battle it is often wiser to take the Shas'el.
 Another character available is the
Ethereal. Despite the fact that the figure looks like he should be handy in a close
combat, do not try to send your Ethereal into the heart of the fighting. Instead, keep him
back with your Fire Warriors to help them and use them for protection. His morale check
reroll can really help bolster any of your units that are getting too high on casualties,
and that's important for your army. Getting him killed will only hurt your army.
Another character available is the
Ethereal. Despite the fact that the figure looks like he should be handy in a close
combat, do not try to send your Ethereal into the heart of the fighting. Instead, keep him
back with your Fire Warriors to help them and use them for protection. His morale check
reroll can really help bolster any of your units that are getting too high on casualties,
and that's important for your army. Getting him killed will only hurt your army.
The Fire Warriors are your basic Tau troopers. Armed with pulse rifles, they are able to devastate enemy infantry and can even damage many vehicles (including most APCs), all at a range of 30". Fire Warriors should be kept in a firing line, given cover where possible (and shield drones where not possible). It is a good idea to spread your fire a little bit around the table, allowing you to target more units and not giving your opponent any way to flank you. Don't spread your fire too much, you want to concentrate two or three squads on a target until it is destroyed. A Shas'ui is very useful for his Ld 8 and the ability to control some drones. You can also use the markerlight he can take to light up a squad for future shots, which is very useful if you want to take out a particular squad or target. If you want to move your Fire Warriors around some, take a few pulse carbines. The mobile firepower provided by them will be very useful.
Buying one or two Devilfish will help you reposition some of your Fire Warriors quickly, should you need to get a better firing position or escape from some threat. Since the Devilfish is an APC, it is lightly armed, only having a single burst cannon. However, it has good front armour and decent side armour. With hatches on the sides and rear allowing exit, and being a skimmer, the Devilfish is an excellent APC. Try to keep the Devilfish's rear behind some trees or other obstacle, making it hull down. This will protect the vulnerable rear armour and your exiting troops, while presenting your stronger front armour and give your burst cannon a line of sight to any threats. If you need to, keep its gun drones nearby for extra protection from infantry assaults.
 Your Pathfinders and Stealth Suits,
while being very different in terms of survivability and location on the Force
Organization Chart, perform similar roles. They are both very useful for setting up
ambushes. Your Stealth Suits will be hard for your opponent to hit with their special
rules limiting range to see them, and their burst cannons make them good at taking out
enemy infantry. Their jump packs allow great flexibility in movement, so you can dart out
of cover to fire and then dart back into cover, using their burst cannons to take out a
few troops.
Your Pathfinders and Stealth Suits,
while being very different in terms of survivability and location on the Force
Organization Chart, perform similar roles. They are both very useful for setting up
ambushes. Your Stealth Suits will be hard for your opponent to hit with their special
rules limiting range to see them, and their burst cannons make them good at taking out
enemy infantry. Their jump packs allow great flexibility in movement, so you can dart out
of cover to fire and then dart back into cover, using their burst cannons to take out a
few troops.
Similarly, the Pathfinders' abilities to deploy forward quickly, coupled with their pulse carbines, allow them to get closer to your opponent's army and greatly disrupt his battle plan. The short range of your carbines is offset by their ability to fire shots while on the move. The pulse carbines can also pin an opposing unit, which will help further disrupt your opponent's movements. Moving around is little problem for either unit, as the Pathfinders are mounted in a Devilfish and the Stealth Suits have jump packs. Because the Pathfinders will be deploying further forward than your other troops, it is a good idea to give them photon grenades, denying your opponent's bonus attacks when he charges the Pathfinders.
The Tau Battlesuits are very useful, and another important part of the army. The Broadside is built with one purpose in mind: smash the opposition with superior firepower! The twin linked rail guns and smart missiles give the Broadside some powerful weaponry, but don't forget that it can be taken down by opposing firepower as well. Don't forget, you can also choose some other weapons in place of the missile pods, which may be more appropriate, such as the twin linked plasma rifles. If you're feeling particularly daring, you can walk the Broadside through some woods to give it some cover. If you're not feeling that daring, you can protect your Broadside by using a shield generator (which you should do anyway). A target lock is very useful, allowing you to fire at two targets at the same time.
Your other battlesuits, the Crisis, are both more numerous and more versatile than the Broadside. You can use either a plasma rifle or burst cannon for taking out enemy infantry with multiple shots, or use a fusion blaster for taking out vehicles (you'll have to close with them to do this, so use cover when possible). Their missile pod is also helpful for taking out infantry and light vehicles. A flamer is not all that useful, since you need to get very close to use it. Since the Crisis suits can move quickly, you can use them to back up any squads mounted in Devilfish.
One of the biggest dangers a Tau army will face is from enemy vehicles, especially APCs carrying assault troops. To this end, they have the Hammerhead. The Hammerhead's rail gun is devastating against heavy tanks, especially with its long range and the Hammerhead's skimmer abilities. (The rail gun is also pretty nasty against troops as well!) If you're playing against an opponent with lighter vehicles, you can use an ion cannon, which is also useful for taking on tough infantry or walkers with its multiple shots. Burst cannons and smart missiles are both useful for taking out troops and light vehicles, though the missiles are a little bit better at taking out vehicles. Remember, since the Hammerhead is not a Fast vehicle you will have to decide whether you want to fire your weapon(s) or move further than 6" to gain the advantage of being a skimmer (no penetrating hits). Because of this, you should use cover to protect your Hammerhead when you can (as being hull down will not allow penetrating hits either). The only way to truly keep your Hammerhead protected will be placing it behind a wall. You need to present your frontal armour where possible, but the rear mounted turret will make finding cover that allows you to do this very hard. Use decoy launchers and a disruption pod to protect your Hammerhead. Buying a drone uplink will provide you with a couple of gun drones, which can also be useful, preventing any infantry from sneaking up on your Hammerhead's rear. You can get around the vehicle's speed weakness by purchasing a multi-tracker, which will let you move over 6" and still fire one weapon. This is highly recommended, as it allows you to move your Hammerhead should the need arise and still keep firing.
The choice of whether to take shield or gun drones for models equipped with drone uplinks depends on your style of play. Gun drones are useful for adding some extra firepower to a unit, but shield drones will give you extra protection when and where you most need it. Since both types of drone have to stay close to the model equipped with the uplink, you should decide which is required more by that model. You can also opt to use a 'squad' of gun drones, which can be used to hunt down enemy squads and individual models.
Finally, a special note on Tau squads being Bonded. This is a very useful upgrade to your Pathfinder and Fire Warrior squads, especially those who will be taking the brunt of the fighting, so take it into serious consideration. It's not as important for other squads, but it's useful nonetheless.
THE KROOT
The Kroot are the protectors of the Tau. They are needed to protect your army from being engaged in hand to hand, where the Tau will lose quickly. All of the Kroot units are geared toward close combat, but that doesn't mean they can't shoot. Nothing could be more wrong; the Kroot can put out some pretty decent firepower.
The Kroot Carnivore squad is very good in close combat while being decent with their guns. Each squad should be paired up with a Tau squad or two, to help protect it from the inevitable assaults that will come their way. Only through the use of Kroot squads protecting your Tau will you be able to consistently win. For the safety of both your Kroots and your Tau, keep the Kroots where they will gain some form of cover save (which helps a lot, with their cover save bonus), allowing them to take a few shots. This protects them while your opponent tries to them out with long ranged firing and then assault your Tau. You should also use your Tau to protect the Kroots. The ability to infiltrate allows your Carnivores to protect your Pathfinders, so don't neglect them. If you can afford it, the Kroot Shaper should be purchased for all Kroot Carnivore squads. They'll help your Kroot Carnivores with Ld and a save (6+), as well as adding their combat abilities. If you go for a unit or two of sacrificial Kroot, though, it's probably better to skip the Shaper with them.
An interesting Kroot is the Krootox. The Krootox is added on to your Carnivore squads. It is the Kroot version of a light Dreadnought (though it doesn't have a power weapon or count as a Monstrous Creature, so don't try to use it as one in HTH!), capable of attacking troops with devastating effectiveness, while still being able to dish out some moderate firepower. The Krootox is best used taking out enemy APCs that are getting too close to your battle lines. Don't try to use it against heavy vehicles!
Hounds are extra attacks for your Kroots, and not much more. While they would
make a great assault unit, they're tied down to being assigned to a Carnivore squad.
However, this does not deplete their usefulness, and one or two groups of Hounds will help
immensely in protecting your Tau.
GENERAL TACTICS
 By now you should have a general
idea of what units you'll want to take and how to use them to compliment each other. So
now it's time to run through a general overview of the Tau army's tactics.
By now you should have a general
idea of what units you'll want to take and how to use them to compliment each other. So
now it's time to run through a general overview of the Tau army's tactics.
Your basic unit, the Fire Warriors, can fire at a greater distance than most other armies' basic units. With a 30" range, the pulse rifle is the longest ranged basic weapon in the game. Its S5 and AP5 make it the most powerful, too. Since it is a rapid fire weapon, your best bet is to hang back with your Fire Warriors and the main portion of your army, firing at your opponent's troops as they cross the table to get to you.
Divide your army's firepower by roles. Kroots, Fire Warriors, Pathfinders, and some battlesuits are good for taking out your opponent's infantry rapidly as they cross the table. Your Hammerhead(s) and Broadsides can take out enemy vehicles, and should target APCs early to prevent a quick assault. To this end even your Fire Warriors can help, as their rifle is strong enough to cause a Glancing Hit even on a Rhino, while being able to fully penetrate Raiders and Trukks. Should any vehicles get too close, the Kroot Ox should be able to handle them, backed up by a Broadside battlesuit.
Don't be afraid to lose a turn's firing moving your Fire Warriors and Pathfinders using Devilfish transports. This is a good idea, as you'll occasionally want to re-deploy. It will help get your unit out of danger should it ever be exposed to an assault, and will also allow you to move that unit's firepower to a more advantageous location (very useful for getting a number of shots against the side or rear armour of a vehicle).
I've done my best to stress this point, but once again I will emphasize it. You must
use Tau and Kroot units in a combined effort in order to win with the Tau. If you do this,
you will be able to win most of your games. If you don't, then you will find yourself
losing almost all of your games. Combined arms is the key to a successful Tau army, and
the Kroot provide the perfect way to achieve that goal.
SPECIFIC TACTICS
The following are specific tactics you can use with the Tau army. You should
experiment with them a little bit to find the one that works for you, and also the
combination of troops you're most comfortable with. This will also allow you to find out
how to use each tactic, and against which armies they work best. Grab a friend and run
through a few friendly games to get the feel of each of these tactics.
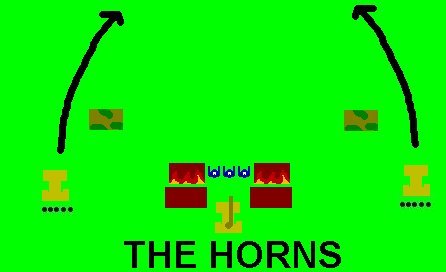 The
Horns
The
Horns
For this tactic to work, you should have a solid core to your army, along with two Fire Warrior units in Devilfish APCs, two Stealth Suit squads, and even possibly two Pathfinder squads. The Pathfinders deploy ahead of the army if possible and move into a forward location quickly. While they find a good location, the Devilfish-mounted Fire Warriors sweep around the flanks of the table and locate their own firing position, then disembark into any available cover. The Hounds will move forward to provide assault protection for the Fire Warriors. Once all of these squads are in position, you will be hitting your opponent's army from three sides! Just be careful with the forward deployed units, as they won't much help should they get into trouble.
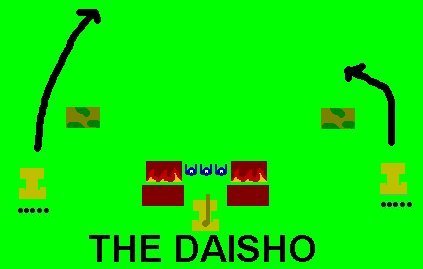 The Daisho ("Long-Short")
The Daisho is simply an alteration of the Horns tactic. Everything is executed in the same way, with a minor change. One of the flanking forces will push forward another 6" to 18" (usually 12" is a good medium), forcing your opponent to worry about this new, and much closer, threat. You'll want to keep the Fire Warriors that are positioned closest to the enemy close to their Devilfish, to allow them a quick getaway should the enemy be too numerous and get too close. Don't worry too much about the loss of firepower this will occasionally incur, as that unit's only purpose will be to distract your opponent, which can be done with minimal shooting.
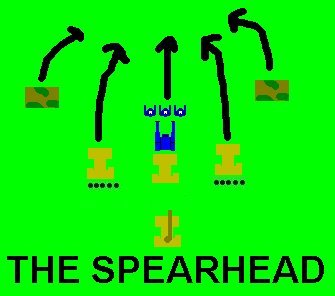 The
Spearhead
The
Spearhead
The Spearhead involves having a mobile force. You'll want lots of Pathfinders,
Devilfish-mounted Fire Warriors, Stealth Suits, and even one or two Hammerheads. At
the beginning of the game, move your army forward in a rush, finding a central location on
the battlefield and disembarking there. You can then begin hitting your opponent
from up close, and might even be within your rapid fire range in just two turns, allowing
you to fire two shots with each of your Fire Warriors. If you've caused enough
damage with your first turn or two of firing, you might even be able to send your Hounds
forward to do some damage. If you have the points after buying the mobile portion of
your army, it might be worth it to invest in some Stealth suits or Crisis battlesuits.
 The
Trident
The
Trident
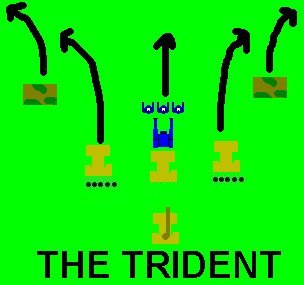
The Trident is simply an alteration of the Spearhead. Instead of moving all of your
troops into a central location, you split your army into three detachments, making one of
them slightly more powerful than the other two. The most powerful detachment moves
into the center of the battlefield, with the two weaker detachments move along the flanks
and find appropriate locations there. This allows you to spread your fire across the
battlefield while still having strong concentrations of it. As above, if you cause
enough damage you might even be able to send the Hounds forward to assault some units.
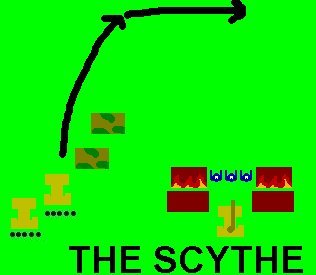
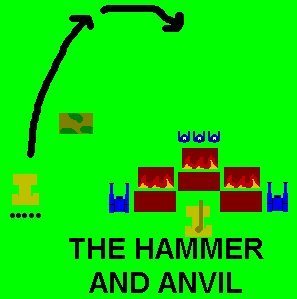
The Scythe/Hammer and Anvil
The Scythe and Hammer and Anvil are much the same tactic. In either, you build a mobile force (usually comprised of two Devilfish-mounted Fire Warrior squads, two Stealth Suit squads, and two Pathfinder squads) and send it sweeping along the flank and battering into or around behind your opponent's army. With the Scythe, your less mobile base of troops will set along one flank, lined up and ready to fire upon any of your opponent's troops that move forward, while your mobile force swings around behind your opponent and sweeps them forward, cutting them down as it goes much like a scythe would. With the Hammer and Anvil, your main base of troops will position themselves in the center of your deployment zone, and your mobile force will act as a hammer to strike the opposing troops and drive them towards your anvil, where they will be crushed between the two forces. While these two tactics are very similar, one key difference is in the composition of the forces. The Scythe works better with more mounted Fire Warriors, since it is the scythe that will be doing most of the damage while the rest of the army picks off any stragglers.
|
SYMBOL KEY
|

1500 Points Sample Army
HQ:
1 Commander Shas'o (HQ) @ 292 Pts
Missile Pod; Plasma Rifle; Multi-Tracker
Hard-wired drone controller [2]
2 Drones @ [30] Pts
Shield Generator (x2)
2 Bodyguard @ [150] Pts
Missile Pod; Plasma Rifle; Multi-Tracker
Elites:
3 Crisis Battlesuit Team (Elites) @ 177 Pts
Burst Cannon; Missile Pod; Multi-Tracker
Troops:
10 Fire Warriors (Troops) @ 184 Pts
Pulse Carbine (x5); Pulse Rifle (x5); EMP Grenades; Photon Grenades; Bonded
1 Shas'ui @ [34] Pts
Pulse Rifle; Markerlight; EMP Grenades; Photon Grenades10 Fire Warriors (Troops) @ 131 Pts
Pulse Carbine (x5); Pulse Rifle (x5); Photon Grenades
1 Shas'ui @ [21] Pts
Photon Grenades10 Fire Warriors (Troops) @ 131 Pts
Pulse Carbine (x5); Pulse Rifle (x5); Photon Grenades
1 Shas'ui @ [21] Pts
Photon Grenades19 Kroot Carnivores (Troops) @ 328 Pts
Kroot Rifle
1 Kroot Shaper @ [47] Pts
Kroot Rifle, Shaper Upgrade
8 Kroot Hounds #1 @ [48] Pts
2 Krootox #2 @ [100] Pts
Kroot Gun (x2)10 Kroot Carnivores (Troops) @ 70 Pts
Kroot Rifle
Heavy Support:
1 Hammerhead Gunship (Heavy Support) @ 185 Pts
Railgun; Two Burst Cannons
#Targetting Array [0]
Seeker Missile [10]
Seeker Missile [10]
Target Lock [5]
Decoy Launcher [5]
Disruption Pod [5]
Models in Army: 82
Total Army Cost: 1498